
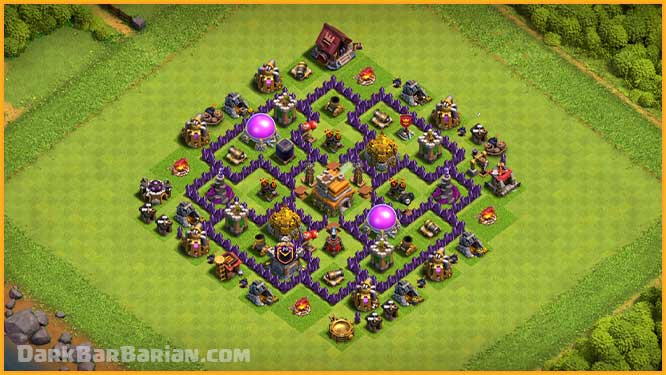
The BEAST TH7 HYBRID/TROPHY [defense] Base 2025!! TownHall 7 Hybrid Base Design – Clash of Clans COC
![The BEAST TH7 HYBRID/TROPHY [defense] Base 2025!! TownHall 7 Hybrid Base Design – Clash of Clans COC](https://darkbarbarian.com/wp-content/uploads/2025/05/thumb.jpg)
If you’re looking for The BEAST TH7 HYBRID/TROPHY [defense] Base 2025!! TownHall 7 Hybrid Base Design – Clash of Clans COC in Clash of Clans, then you have come to the right place. This base is one of the best base for coc Town Hall 10 available on YouTube. This Town Hall 10 coc base layout can be used for Trophy pushing. To know more about this TH10 best coc base, continue reading this post.
BASE DESCRIPTION
Hey everyone, Dark Barbarian here, and welcome back to another post! In this post, we’re presenting you a brand-new Town Hall 7 hybrid base that I think you’re really going to like. This design includes a powerful feature I like to call “The Death Trap,” and I’ll explain how it works below in the post. So, don’t skip the base analysis—it’ll help you understand the reasoning behind each placement.
Let’s dive into the base analysis. First up, the standout feature of this base—what I call the Death Trap. Here’s how it works: say your opponent sends in giants from this direction. Their first targets will be this cannon and then the air sweeper.
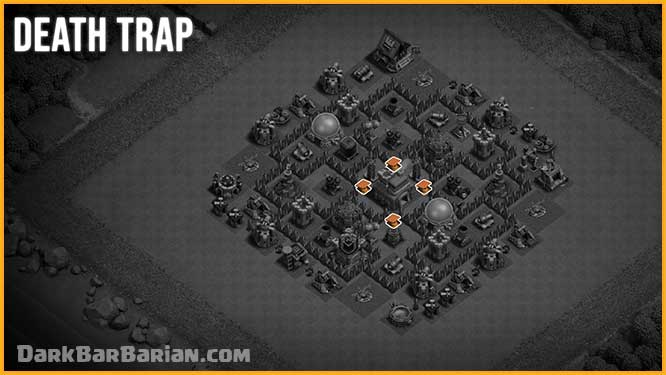
Once those are destroyed, the giants will go for the next most accessible defense. A lot of players assume giants go for the closest defense, like this Archer Tower, but that’s actually not how they work. Giants target the easiest-to-reach defenses. In this case, the air defense is easier to reach because there’s an open path to it, while getting to the Archer Tower would require breaking a wall.
So, the giants will naturally path toward the air defense. And right on that path? A spring trap that’ll launch two giants instantly. Then, as they continue, another spring trap in front of the air defense knocks out two more. After they take down the air defense, the next easiest target is this hidden Tesla, then the second air defense, which leads them right into another spring trap. The pattern repeats, and in total, the trap setup can take out up to eight giants—over 20% of a full army at Town Hall 7—just from clever trap placement.
But that’s not all. We’ve also got defenses positioned perfectly to finish off the remaining giants once they’re weakened.
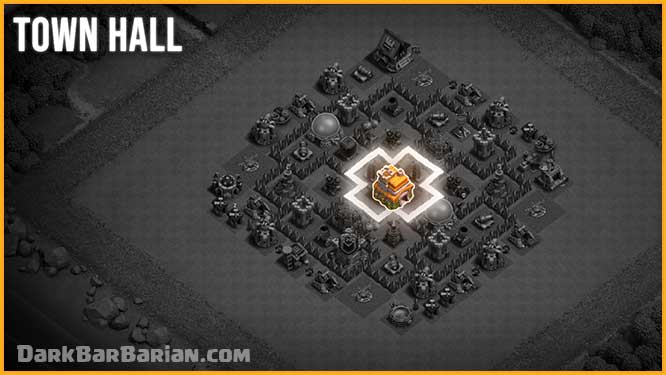
Aside from the Death Trap, the Town Hall is tucked safely in the center of the base, consistent with my other hybrid layouts. It’s crucial to protect the Town Hall since it not only counts for one star but also holds a decent amount of loot.
Now, some of you might be wondering why this cannon is placed outside the walls. To create the Death Trap layout, we had to make a few sacrifices, and that includes placing a defense or two on the outer edge. But honestly, this can be an advantage. At higher Town Halls, this technique is common—it’s meant to throw off attackers.
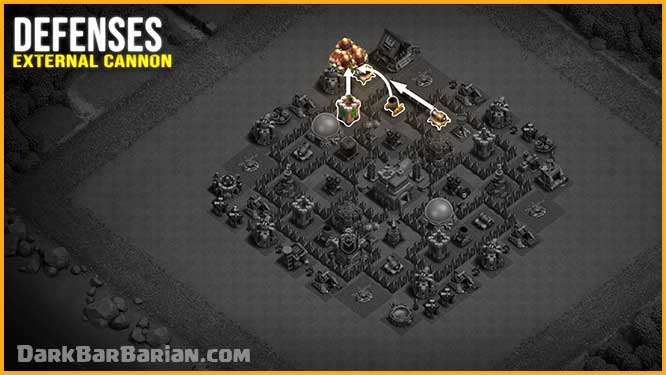
If an opponent attacks from this direction, their giants will target the cannon first since it’s the nearest and easiest defense. While they’re distracted, the surrounding defenses start firing at them. After destroying the cannon, the giants may move unpredictably, throwing off the attack strategy and potentially leading to a failed raid.
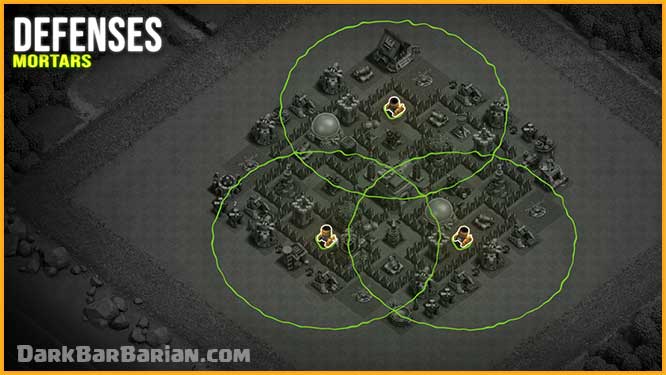
Moving on, the mortars are positioned toward the outer compartments. This helps defend against spam attacks like BARCH, GiBARCH and mass goblins. Even though they’re on the edges, they’re placed in a way that allows their range to cover most of the base.
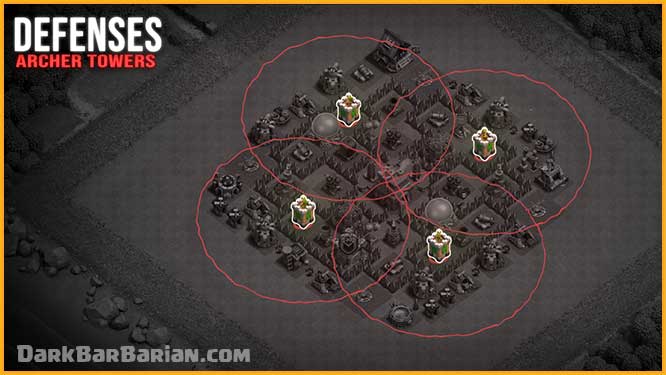
We’ve placed the Archer Towers at all four corners to make sure the entire base is covered from air attacks. This keeps all sides equally protected.
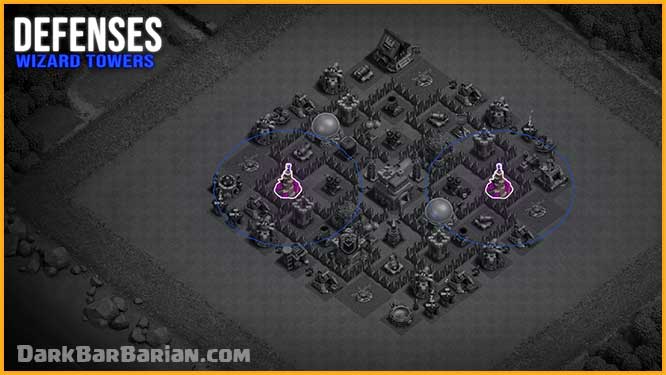
The wizard towers are spaced out to avoid them being taken out by a single spell. Their placement gives balanced coverage and helps protect key defenses across the base.
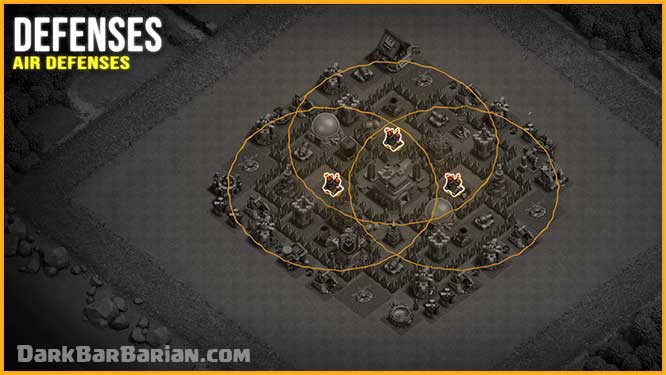
Air defenses are also separated into different compartments to prevent them from being wiped out by lightning spells. Positioned it near central compartments, their range covers a significant portion of the base, providing robust coverage against aerial threats. and paired with air sweepers, which makes it harder for air-based strategies like Mass Loons and Dragons to succeed.
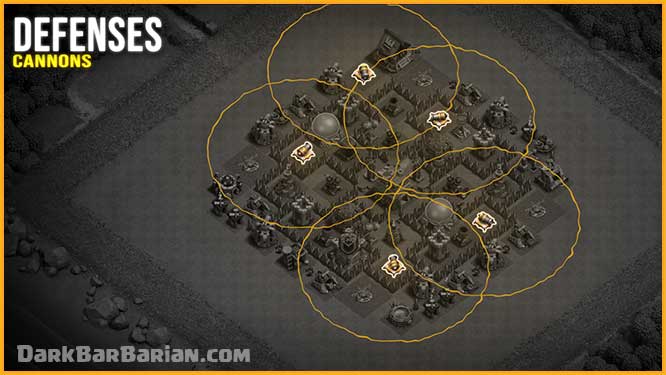
Cannons are used to fill in the rest of the base’s structure. They offer solid support against ground units and help round out the overall defense.
Now for the storages. They’re spread out in separate compartments, unlike many beginner bases where all the storages are lumped together. This means an attacker has to work through the whole base to loot everything, instead of just breaking into one section.
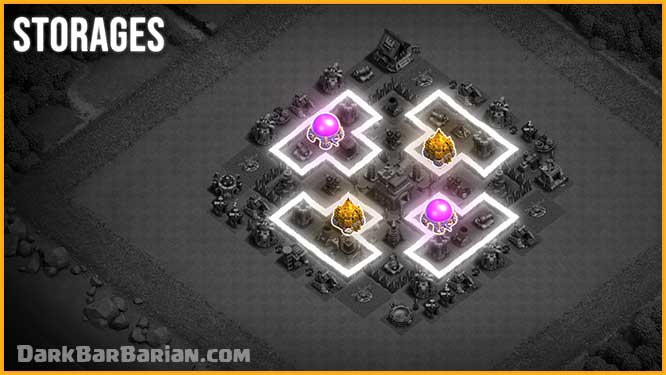
I know some of you might find the placement of the Dark Elixir storage next to the Elixir storage a bit odd, especially if you’re into symmetry, but we couldn’t place the Dark Elixir in the center because that space is reserved for the Death Trap feature. It might look a little off, but trust me—it’s effective at protecting your loot.
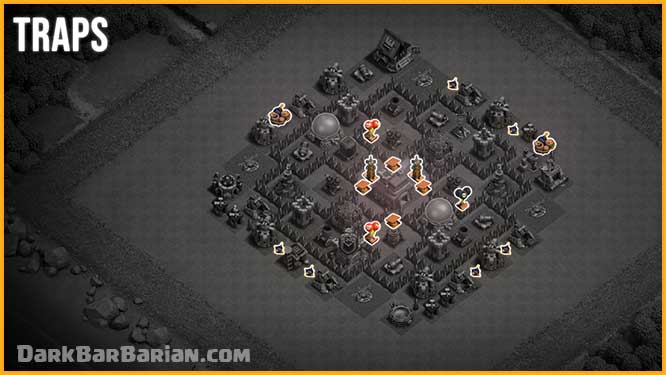
As for the trap placements, we’ve already talked about the spring traps in the core. Let’s look at the bombs and giant bombs. We’ve also placed them near potential wall breaker paths to stop them from breaching the compartments. If they fail to break the walls, the rest of the troops can get stuck outside and waste time on outer buildings, which can ruin the attacker’s strategy.
Now, when it comes to the outer buildings, you have the flexibility to place them however you like. If you’re an active player who collects loot regularly, you can spread them out more to make funneling harder for attackers. This way, you won’t need to worry as much about people stealing loot from your outer collectors since you’ll be collecting from them frequently.
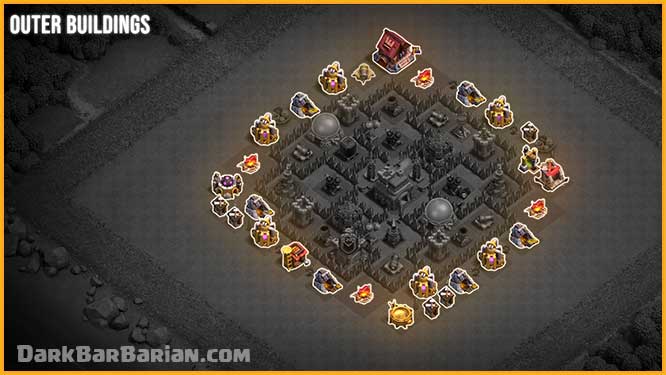
However, if you’re less active, you can go with the layout I’ve used, where the outer collectors are within the range of your defenses. This way, you won’t have to worry about losing loot as easily. Just be sure not to group the same type of collectors together. If you do, the opponent can easily grab all the loot from those collectors at once.
That wraps up the base analysis!
that’s it for this post. I’ve left a copy link for this base down below, so that you guys can easily copy this base, I’ll see you guys in the next one.
BEST DEFENSIVE CLAN CASTLE TROOPS COMBINATIONS
Using clan castle troops for defending your base is highly recommended as they can put the attacker in trouble by distracting them. Even though the base alone is sufficient to stop most of the attacks used by Town Hall 7 attackers, using the clan castle can help a lot. At Town Hall 7 you can get Maximum of 20 housing spaces in your clan castle, here are some of my recommendations for CC troops combinations for the defense at Town Hall 7.
- 1 Baby Dragon + 2 Wizards + 2 Archers
- 1 Witch + 2 Wizards (Recommended)
- 2 Valkyries + 1 Wizard
- 1 Dragon
Since most people can’t get these troops from their clans, you can also use other troop combinations which are easily available like all wizards, all balloons or any other troop combination but i highly recommend you to have above mentioned troops for best defensive experience at Town Hall 7.
FEATURES OF THIS BASE
- Centered and well-protected Town hall
- outer cannon helps to fail the attack from southern side
- Air Defenses well protected away from one another
- Wizard Towers covers alot of defenses
- Death Trap, perfect traps placement according to pathing of troops
- Beast Against Ground attacking strategies
- Optimal for Farming and Trophy Pushing
- Archer Towers cover the whole base
- Storages in separate compartments away from one another
COPY BASE
If you want to copy this base just click on the Copy Base Button, it will redirect you, from where you can easily copy this base design.
Copy Base![ULTIMATE BEAST TH7 HYBRID/TROPHY [defense] Base 2026! TownHall 7 Hybrid Base Design – Clash of Clans](https://darkbarbarian.com/wp-content/uploads/2026/01/thumbnail-300x169.jpg)
![LEGENDRY TH7 HYBRID/TROPHY [defense] Base 2025!! TownHall 7 Hybrid Base Design – Clash of Clans COC](https://darkbarbarian.com/wp-content/uploads/2025/09/thumbnail-1-300x169.jpg)

It’s so good
Hi
Good video s
D
Long time
Grac
nice
Attractive hall