
NEW BEST TH9 HYBRID/TROPHY Base 2025!! | Town Hall 9 (TH9) Hybrid Base Design – Clash of Clans (COC)
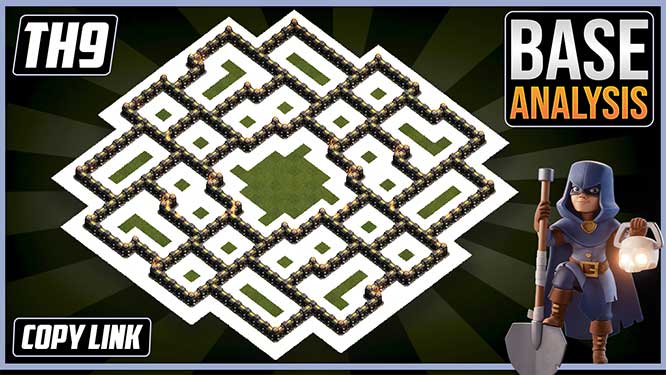
If you’re looking for the NEW BEST TH9 HYBRID/TROPHY Base 2025!! | Town Hall 9 (TH9) Hybrid Base Design – Clash of Clans (COC) in Clash of Clans, then you have come to the right place. This base is one of the best and most popular bases for coc Town Hall 9 available on YouTube with over 200k+ views on YouTube. This Town Hall 9 coc base layout can be used for Trophy pushing. To know more about this TH9 best coc base, continue reading this post.
BASE DESCRIPTION
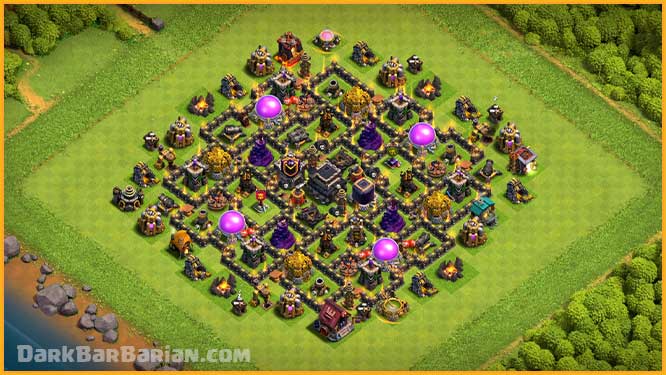
Hey guys, what’s up! It’s Dark Barbarian, and I’m back with another brand-new TH9 hybrid base design that I’m sure you’re going to love. This base is built to protect your loot while still putting up a solid defense in wars and trophy pushing. Stick around till the end, because we’ll go over every detail of why each building is placed the way it is and how it helps the base perform better.
let’s dive right into the Base Analysis!
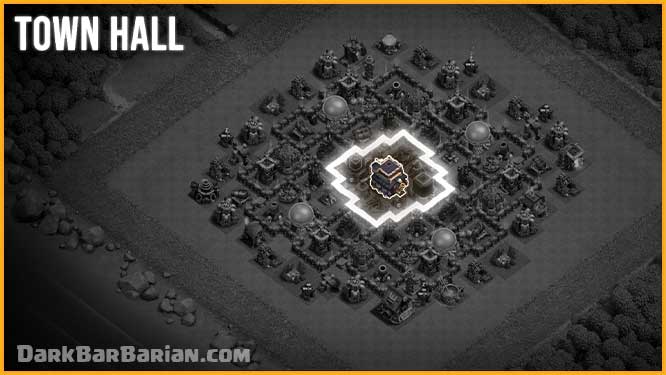
As you can see, the Town Hall is placed safely in the center of the base, just like in my other hybrid designs. Keeping it in the core is crucial since it’s worth one star and a good chunk of loot, so we want it to be as hard to reach as possible. Surrounded by multiple layers of defenses and walls, it’s not something attackers can easily target early on.
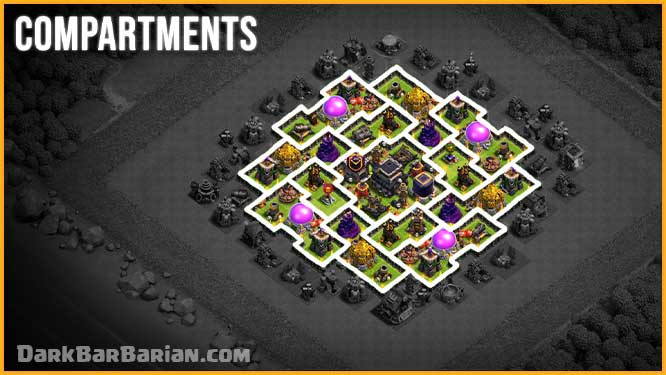
One of the biggest strengths of this base is the high number of compartments spread across the entire layout. These compartments slow down enemy troops significantly, forcing them to break through layer after layer of walls. Troops like Giants and Golems often get stuck while defenses keep chipping away at them, and in many cases, attackers either run out of time or run out of troops before they can reach the core.
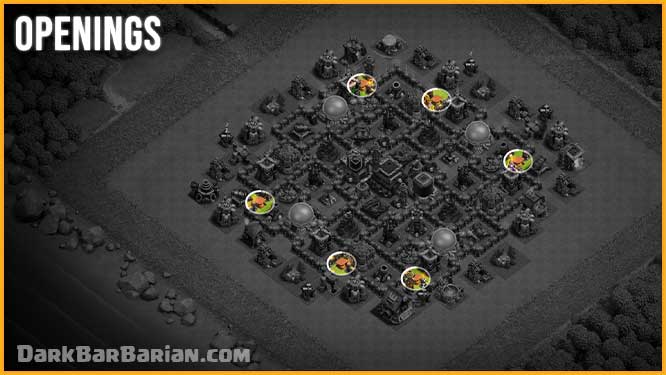
We’ve also created intentional openings in the first layer of compartments on all four sides of the base. The purpose of these openings is to lure defense-targeting troops directly into the path we want them to follow, instead of letting them break walls randomly. But don’t think these are weak points — we’ve cleverly placed traps in those entry spots, so instead of gaining an easy entry, enemy troops walk straight into a deadly surprise. It’s a smart way to control troop pathing while maximizing trap effectiveness.
when it comes to defenses, they’re strategically positioned to cover the entire base, making it a fortress from every direction.

Mortars are positioned towards the outer sections of the base. This placement is intentional to counter spam strategies like BARCH, G BARCH and mass Goblins early in the raid. They cover most of the base area — except the core, which doesn’t need mortar coverage since weak spam troops rarely make it that far.
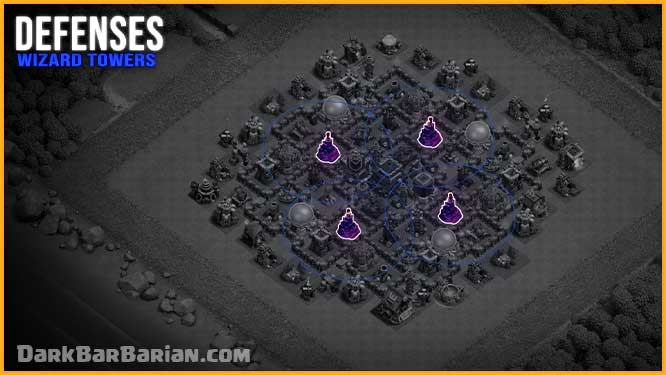
Wizard Towers are strategically spread out in separate compartments to ensure they’re not all taken out by lightning spells at once. Their splash damage range covers large portions of the base, supporting defenses on both the core and the outer layers, and providing excellent protection against groups of Balloons, Wizards, or Minions.
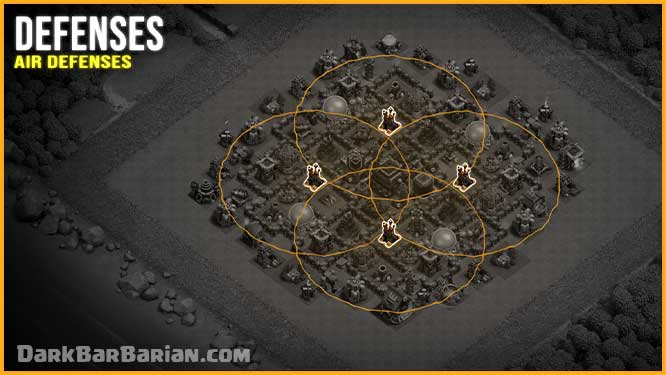
Air Defenses are placed deep inside the base in individual compartments to prevent them from being wiped out together by lightning spells. Their coverage spans a large portion of the base, making it difficult for air attacks like Lavaloon and Mass Dragons to succeed. They are also paired with Air Sweepers to add an extra layer of resistance against air pushes.
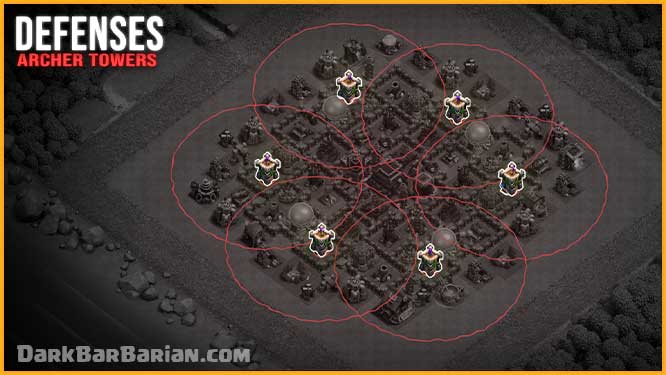
Archer Towers are evenly distributed across all sides of the base, ensuring full 360° air coverage. No matter where an attacker comes from, they’ll be met with consistent anti-air firepower.
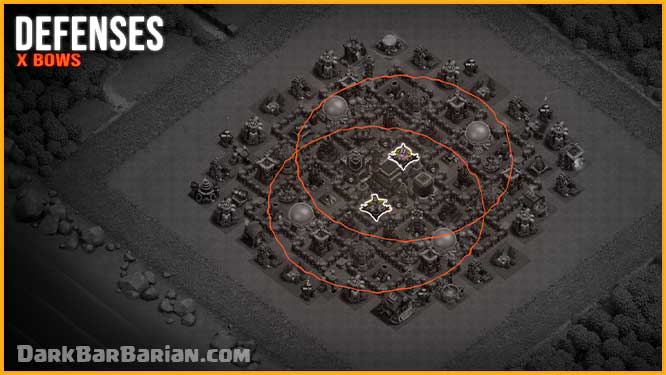
The X-Bows are placed in the central compartments, allowing their range to cover a huge portion of the base. Set to target both ground and air, they provide constant support to other defenses and help shut down both types of attacks effectively.
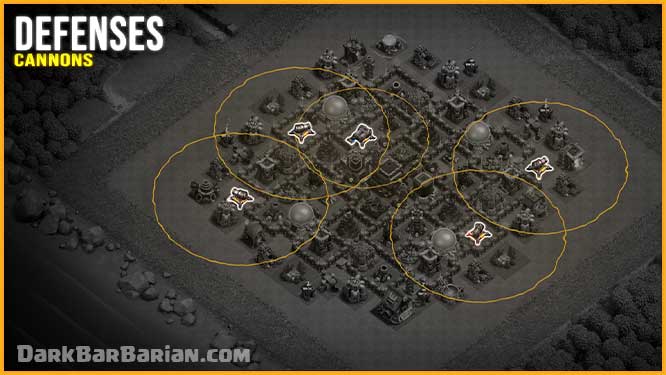
Cannons are positioned to balance out the ground defense across the base, strengthening areas that could otherwise be vulnerable to ground-heavy strategies like Giants, Bowlers, or Hogs.
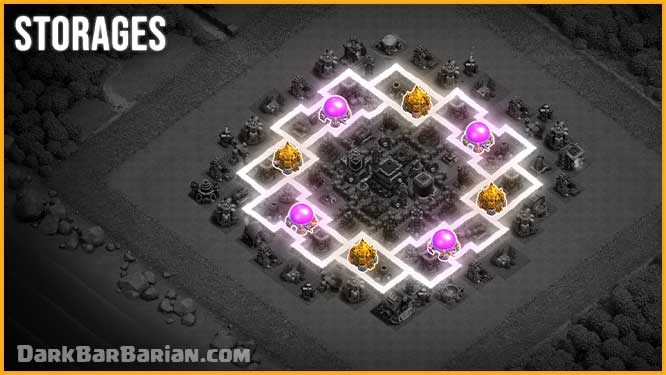
Storages are placed in separate compartments instead of being clustered together. This design forces attackers to take down the entire base if they want all your loot. They’re also placed alternatively (gold, elixir, dark elixir) to ensure you don’t lose all of one resource type if one section is breached, for example, if we put all the gold storages on this side of the base, the attacker can take almost all your gold just by taking out this portion of the base. and if we are losing the loot, it’s better to lose it in a balanced way rather than losing all the loot of one kind of resource, so to avoid that, we place them alternatively, just like our base.
The Dark Elixir Storage is well-protected in the core, making it extremely difficult for opponents to reach and steal.
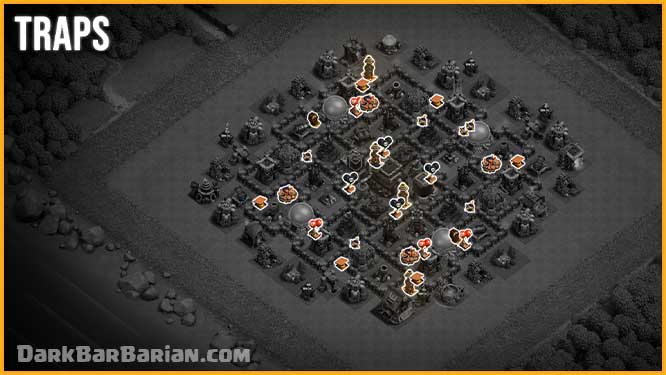
Now coming to the placement of the traps, after observation of so many attacks on this base,spring traps and giant bombs are strategically placed according to the pathing of defense attacking troops like hogs and giants, which helps in making this base stronger against ground attacks
Seeking air mines and air bombs are placed to help the air defences in taking out air troops such as balloons, dragons, baby dragons, and lava hounds.
When it comes to small bombs, we’ve placed them inside the base — but not to stop Wall Breakers this time. Since we already discussed the planned openings earlier, we don’t need small bombs for wall-breaking defense. Instead, they’re used here for additional troop damage deeper inside the base.
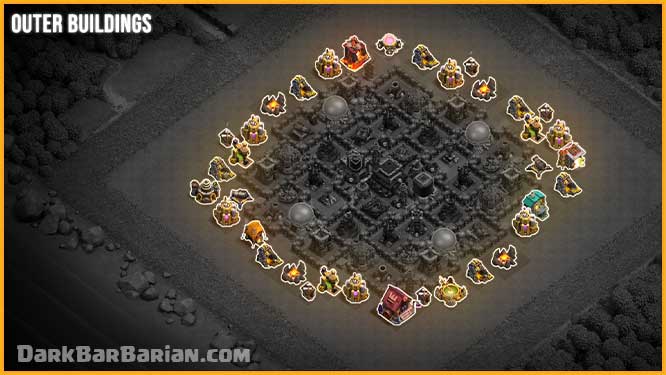
The outer buildings are placed in a way that can be customized based on your activity. If you’re active, you can spread them out to mess with enemy funneling. If not, you can keep them closer to defenses so they remain protected. Just make sure collectors of the same type aren’t grouped together, so attackers can’t steal all your loot too easily.
That wraps up the base analysis.
Now, I’ve left a copy link for this base below so that you guys can copy it easily.
BEST DEFENSIVE CLAN CASTLE TROOPS COMBINATIONS
Using clan castle troops for defending your base is highly recommended as they can put the attacker in trouble by distracting them. Even though the base alone is sufficient to stop most of the attacks used by Town Hall 9 attackers, using the clan castle can help a lot. At Town Hall 9 you can get Maximum of 30 housing space in your clan castle, here are some of my recommendations for CC troops combinations for defense at Town Hall 9 :-
- 1 Electro Dragon (Recommended)
- 1 Baby Dragon + 2 Valkyrie + 1 Wizard
- 1 Golem
- 1 Witch + 4 Wizards + 2 Archers
- 1 Lava Hound
- 1 Dragon + 2 Wizard + 2 Archer
Since most people can’t get these troops from their clans, you can also use other troop combinations which are easily available like all wizards, all balloons or any other troop combination but i highly recommend you to have above mentioned troops for best defensive experience at Town Hall 9.
FEATURES OF THIS BASE
- Centered and well-protected Town hall
- Air Defenses well paired and protected with air sweepers
- Perfect traps placement
- All 4 Tesla in the central compartment to make core strong
- Wizard Towers in well-protected compartments
- Beast Against Ground & Air Attacks
- Mortars placed in outer compartments to stop spam attacks
- X-bows in well protected central compartments
- Archer Towers covers the whole base.
COPY BASE
If you want to copy this base just click on the Copy Base Button, it will redirect you, from where you can easily copy this base design.
Copy Base
![THE INSANE TH9 HYBRID/TROPHY[defense] Base 2025!! COC TownHall 9 Hybrid Base Design – Clash of Clans](https://darkbarbarian.com/wp-content/uploads/2025/06/thumbnail-300x169.jpg)
![BEST INSANE TH9 HYBRID/TROPHY[defense] Base 2025!! COC TownHall9 Hybrid Base Design – Clash of Clans](https://darkbarbarian.com/wp-content/uploads/2025/02/thumb-300x169.jpg)
วว