
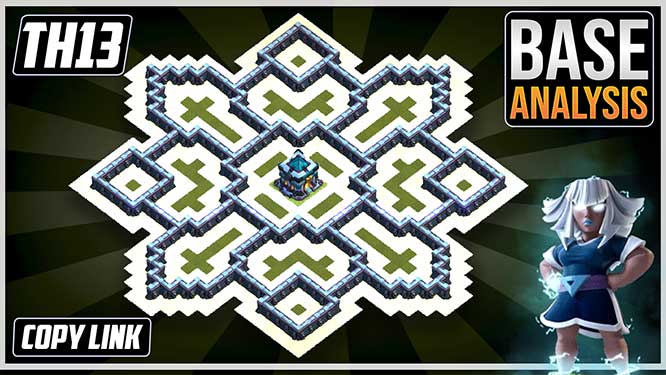
BEST BASE TH13 HYBRID/TROPHY Base 2025 | Town Hall 13 (TH13) Hybrid Base Design – Clash of Clans COC
If you’re looking for BEST BASE TH13 HYBRID/TROPHY Base 2025 | Town Hall 13 (TH13) Hybrid Base Design – Clash of Clans COC, then you have come to the right place. This base is one of the best base for coc Town Hall 13 available on YouTube. This Town Hall 13 coc base layout can be used for Trophy pushing. To know more about this TH13 best coc base, continue reading this post.
BASE DESCRIPTION
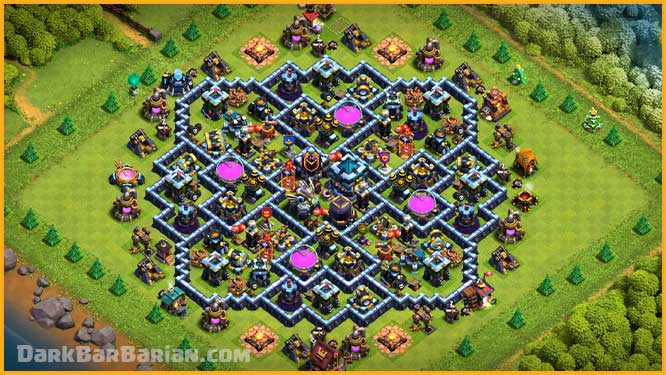
What’s up guys, it’s Dark Barbarian here, and today I’ve got an awesome brand-new Town Hall 13 hybrid base for you. This base is built to protect both your loot and trophies at the same time. I’ll be breaking down every feature in detail during the base analysis part of this post, so you can understand exactly how it works and why it’s designed this way.
let’s get into the base analysis!
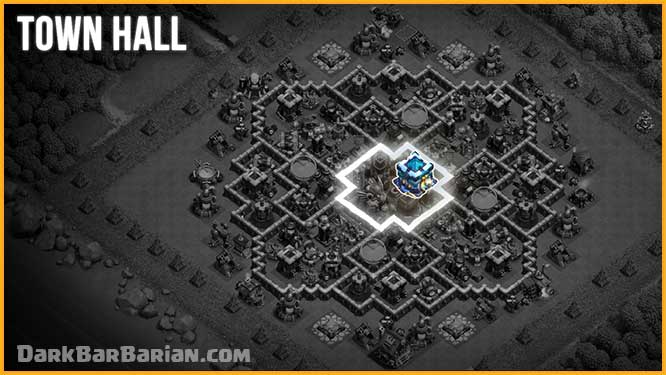
Let’s start with the Town Hall, The Town Hall is placed right in the center of the base, just like most of my hybrid designs. This central positioning ensures maximum protection for your loot and that crucial one-star.
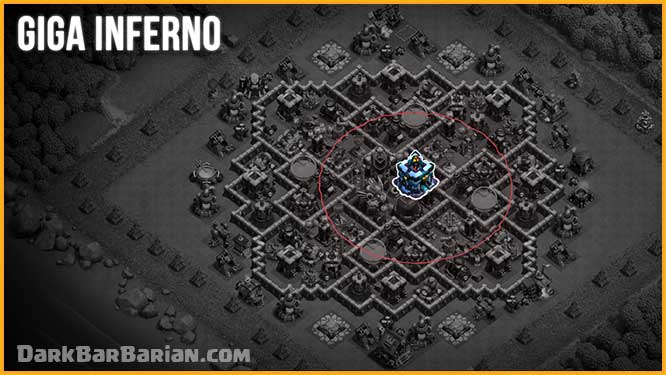
At Town Hall 13, the Giga Inferno built inside the Town Hall makes it an offensive powerhouse. Once enemy troops step into its range, it activates and deals massive damage over time. Its coverage overlaps with key defenses like the Inferno Towers, Eagle Artillery, and X-Bows, making the core of the base deadly to any push that reaches it.
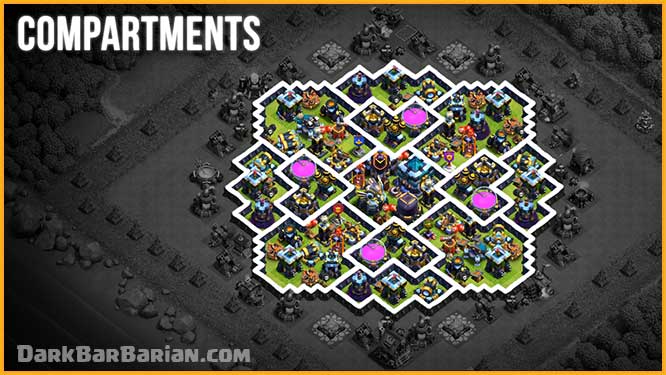
One of the biggest strengths of this base is the sheer number of compartments. These walls and sections are built to slow down attacking troops, causing them to lose momentum or run out of time. High-health troops like Golems, Pekkas, and Ice Golems get stuck breaking through walls while your defenses pick them off one by one.
When we look at defensive coverage, all major defenses are placed to protect the entire base evenly. This way, no side is left weaker than another.
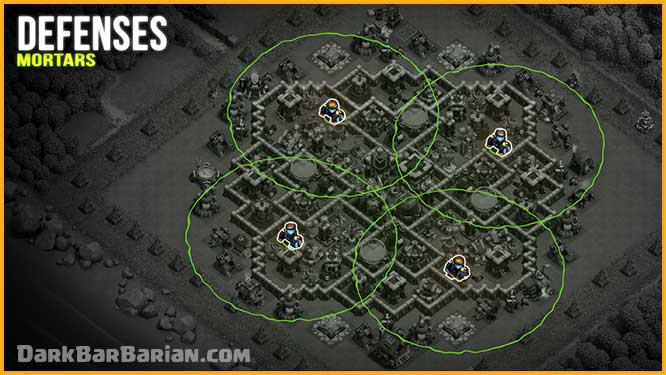
Mortars are set up in the outer compartments to deal with spam-style attacks like BARCH, G-Barch, or mass Goblins. Their long splash range covers most of the outer base where these small troops usually appear, and since weak units rarely make it to the core, mortar protection isn’t needed inside.

For air defense, each Air Defense is placed in a separate compartment. This spacing prevents attackers from taking out multiple Air Defenses with a single Lightning Spell combo. Their coverage overlaps almost the entire base, making it highly effective against air strategies.
Supporting them are Air Sweepers, positioned strategically to push back Electro Dragons, LavaLoons, and Dragon attacks, disrupting their chain damage and formation.

The Wizard Towers are placed near the storages and outer layers. Their splash damage protects your loot buildings from mass troops like Minions, Goblins, or BARCH, while also making it tough for attackers to group their troops effectively. They’re spread out so that one Lightning Spell set can’t take out multiple Wizard Towers at once.

Each outer compartment is reinforced with Archer Towers, carefully spaced to provide balanced coverage. This setup gives strong protection against both air and ground attacks. By spreading them evenly, the base maintains equal defensive strength from all directions, preventing any weak side for attackers to exploit.

Inferno towers are pretty much the most important defense we have at town hall 13, so keeping them safe while making full use of their potential to increase the effectiveness of the base is our top priority. As a result, I’ve decided to place them in a different compartment of the base, where they are well protected and their range covers a lot of main defenses and important stuff like the town hall and dark elixir storage.
You can switch their mode depending on what you’re facing. For low hitpoint and high troop count armies like miners, bowlers, and witches, multiple mode is recommended, but against stronger armies with high hitpoint and lower troop count like golems, electro dragons and pekkas, single mode would be a better choice.
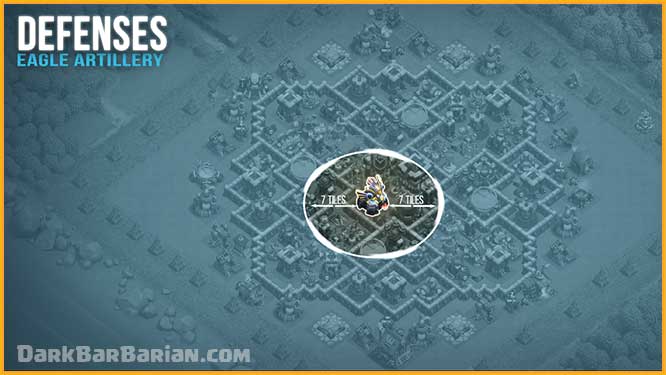
The Eagle Artillery sits perfectly in the center of the base, protected by layers of high-hitpoint structures. Its massive range allows it to strike almost anywhere on the map, except for the first seven tiles around it—which are already covered by nearby defenses. This ensures that the Eagle keeps firing until the very end of a battle.

The X-Bows are positioned in four key compartments around the core and set to both ground and air mode. I’ve been targeted by both types of attacks, so setting them to ground-only just for the extra range isn’t really worth it.
We’ve placed cannons strategically where they’re needed, balancing the base for effective ground defense.
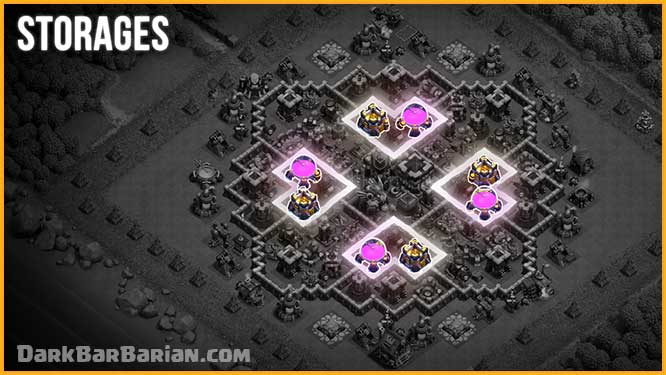
Now coming to storages, they are evenly placed in different compartments, this is the mistake that most beginner base designers make that they place all the storages in the center, and defenses in the outer compartments. so once the attacker break through the compartment of defenses they get access to all the loot.
which is not the case in this base because the storages are placed in different compartments, the attacker has to take out the whole base in order to get all the loot.
never put the same type of storages on one side of the base, for example, if we put both the gold storages on this side of the base, the attacker can take almost all your gold just by taking out this portion of the base. so in order to avoid that. we place them alternatively, just like this base.
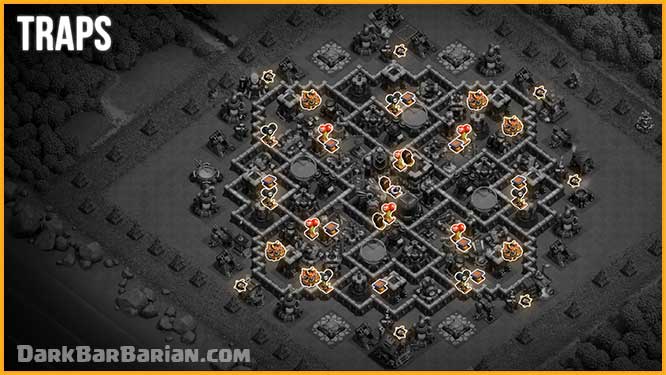
Now let’s talk about trap placements. after observation of so many attacks on this base, spring traps and giant bombs are strategically placed in different compartments according to the pathing of defense attacking troops like hogs and giants, which helps in making this base stronger against ground attacks.
Bombs and Giant Bombs are set up to eliminate Wall Breakers. If they go off successfully, attackers will struggle to breach compartments, causing their troops to wander around the outside and lose momentum.
For air traps, Air Bombs and Seeking Air Mines are spaced out to weaken enemy air units, helping your air defenses finish them off before they can do too much damage.
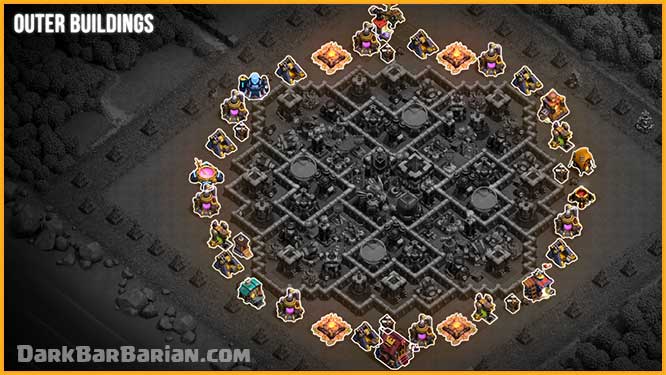
When it comes to outer buildings, you can customize their placement however you prefer. Just make sure not to group the same type of collectors together—placing all Gold Mines or Elixir Collectors on one side makes it easy for attackers to farm your loot. Also, try to keep them slightly separated to prevent chain lightning from Electro Dragons damaging multiple buildings at once.
And that wraps up the base analysis!
I’ve left a copy link for this base down below of the video so that you guys can easily copy this base.
BEST DEFENSIVE CLAN CASTLE TROOPS COMBINATIONS
Using clan castle troops for defending your base is highly recommended as they can put the attacker in trouble by distracting them. Even though the base alone is sufficient to stop most of the attacks used by Town Hall 13 attackers, using the clan castle can help a lot. At Town Hall 13 you can get Maximum of 45 housing space in your clan castle, here are some of my recommendations for CC troops combinations for defense at Town Hall 13 :-
- 1 Lava Hound + 1 Head Hunter + 9 Archers (Recommended)
- 1 Lava Hound + 2 Head Hunter + 3 Goblins
- 2 Super Minnion + 2 Head Hunter + 3 Archers
- 1 Inferno Dragon + 2 Head Hunter + 7 Archers
- 1 Lava Hound + 1 Ice Golem
Since most people can’t get these troops from their clans, you can also use other troop combinations which are easily available like all wizards, all balloons or any other troop combination but i highly recommend you to have above mentioned troops for best defensive experience at Town Hall 13.
FEATURES OF THIS BASE
- Troops pathing manipulation to walk them over traps
- Air Defenses placed in well protected compartments
- Alot of compartments helps in slowing down troops.
- Eagle Artillery well protected in core compartment
- Wizard Towers in different compartments away from one another.
- Scattershots well protected in core
- Inferno towers placed in the core of the base
- X-bows covers the whole base
- Archer Towers in each corner of the base.
COPY BASE
If you want to copy this base just click on the Copy Base Button, it will redirect you, from where you can easily copy this base design.
Copy Base

Hiii
Cool