
The BEAST TH11 HYBRID/TROPHY Base 2025!! COC Town Hall 11 (TH11) Trophy Base Design – Clash of Clans
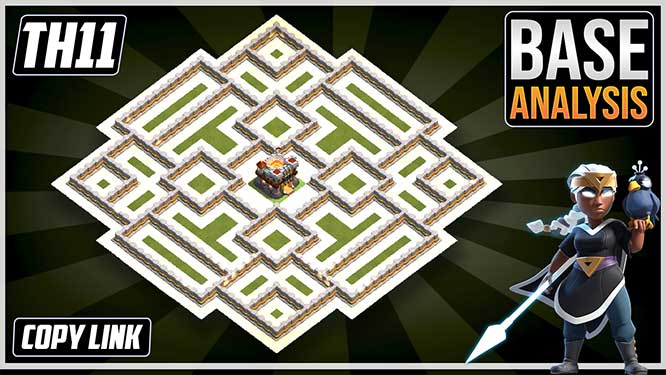
If you’re looking for The BEAST TH11 HYBRID/TROPHY Base 2025!! COC Town Hall 11 (TH11) Trophy Base Design – Clash of Clans, then you have come to the right place. This base is one of the best base for coc Town Hall 11 available on YouTube. This Town Hall 11 coc base layout can be used for Trophy pushing. To know more about this TH11 best coc base, continue reading this post.
BASE DESCRIPTION
Hey everyone, this is Dark Barbarian, and today we’re creating a brand new Hybrid Base for Town Hall 11. This base is designed to strike the perfect balance between protecting your resources and maintaining your trophy count, so you’re ready to handle both farming and competitive attacks effectively.
I’ll delve into the details of this base during the analysis portion of the post, where we’ll break down the strategic placements of defenses, traps, and resource storages. This will help you make an informed decision about whether or not this base is the right fit for your playstyle.
Let’s do the Base Analysis!

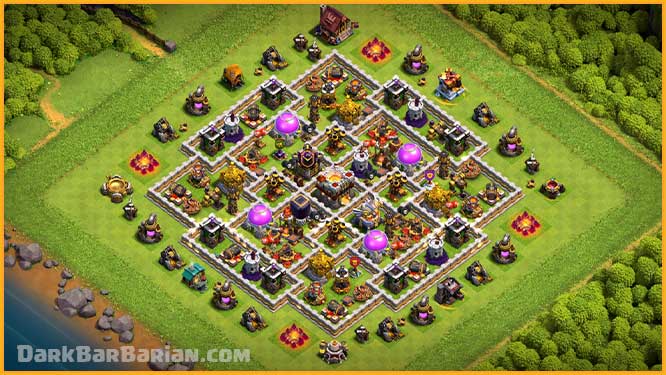
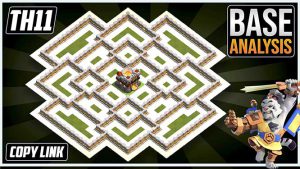
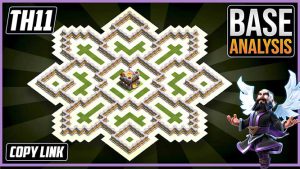
First and foremost, the Town Hall is securely shielded within the middle compartment of the base. This positioning is intentional because we want to ensure that attackers have a tough time reaching it, helping us save that crucial one star and protect the loot it contains.
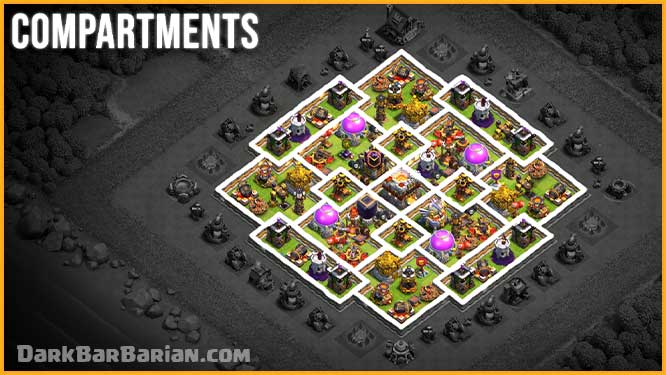
One of the major advantages of this base is the abundance of compartments. These compartments are strategically placed throughout the layout, acting as effective obstacles that slow down enemy troops. This design often causes attackers to either run out of time or deplete their forces before reaching the core. Troops like giants, golems, and ice golems frequently get stuck within these compartments, unable to progress effectively. This compartmentalized structure creates choke points, making it extremely difficult for enemies to sustain their attack and leading to frequent failed attempts.
now coming to the defenses, they are placed in such a way that they cover the whole base and the base remains strong from all the sides.
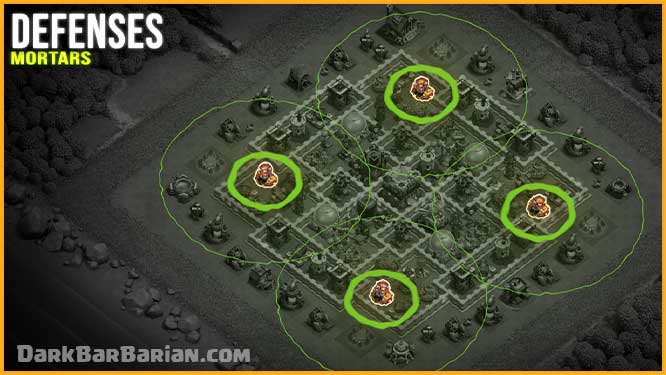
Mortars are primarily directed at the outer areas of the base, this placement is to protect against spam attacks like Mass Goblins, G-BARCH, and BARCH. However, their placement is not limited to guarding just the outer buildings, They are strategically positioned to ensure their range extends to cover inner defenses as well, providing layered protection and making it challenging for attackers to exploit any weak points within the base.
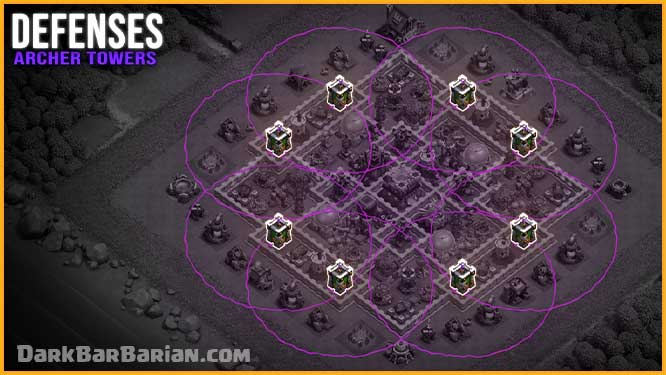
Archer towers are placed in each outer compartment at proper distances apart in order to protect the entire base from air forces; doing so creates a pretty nice balance to the base, making it more effective against all types of attacks, be it an air attack or ground attack.
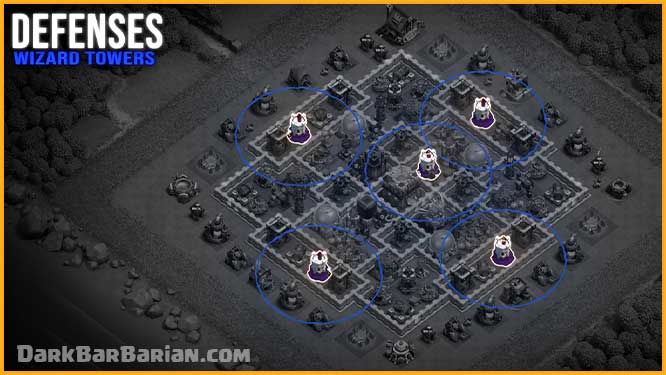
Wizard towers are crucial defenses at Town Hall 11. To maximize their effectiveness, it’s important to position them in well-protected areas where they can cover a majority of the defenses, Placing them in separate compartments and checking the number of defenses within their range is essential when creating or selecting a base. If wizard towers only cover a few defenses, their placement should be reconsidered.
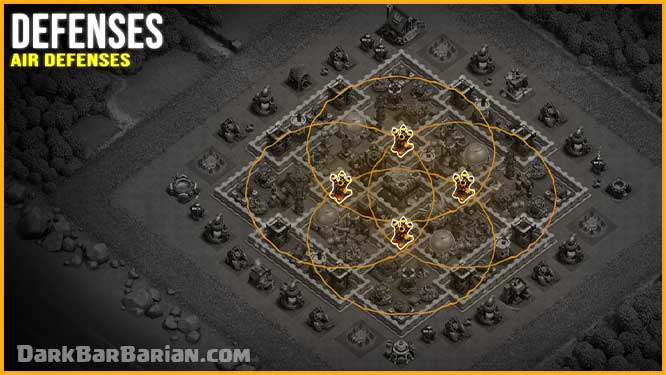
The air defenses are strategically placed in separate compartments To protect against lightning spell attacks, ensuring they are not easily wiped out together. Positioned carefully, their range covers the majority of the base inside the walls, providing robust air protection. When combined with other air defense structures, this layout becomes incredibly formidable against air attacks.
Additionally, air sweepers are positioned to further strengthen the base’s defense against aerial assaults such as Lava Loons, Mass Dragons, and Electro Dragons, Pushing back enemy air troops and disrupting their attack flow.
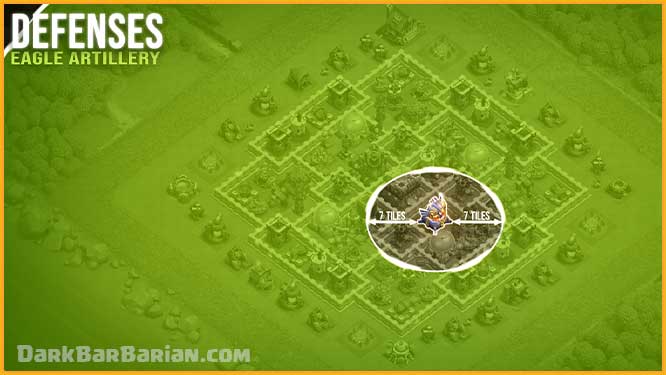
The Eagle Artillery is placed in the core of the base because it is the most powerful and vital defense at Town Hall 11. Placing it in the core ensures maximum protection and makes it difficult for attackers to target early in their assault. Its range covers the entire base, except for the first 7 tiles, which are effectively handled by other defenses. This placement allows the Eagle Artillery to deal devastating damage to troops while being well-guarded against enemy forces.
Inferno towers are crucial defenses at Town Hall 11, following the eagle artillery. Their placement near the core of the base ensures both their safety and effectiveness, as they cover important defenses and structures like town hall, dark elixir storage, eagle artillery, and x-bows.
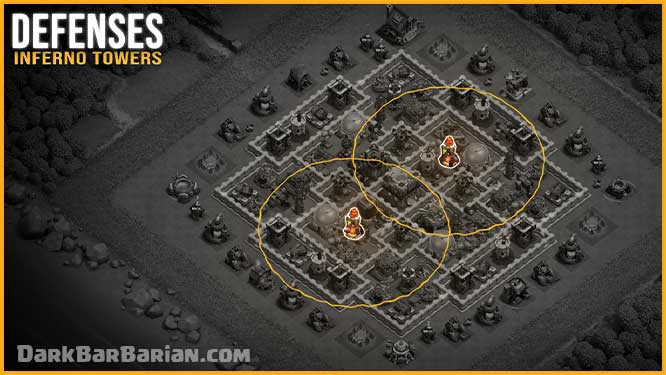
To optimize their performance, adjusting the inferno tower mode based on the enemy armies is crucial, Multiple mode works best against armies with lower hitpoints but larger troop numbers such as miners, bowlers, and witches, while single mode is ideal against high hitpoint troops such as electro dragons, pekkas, and golems.
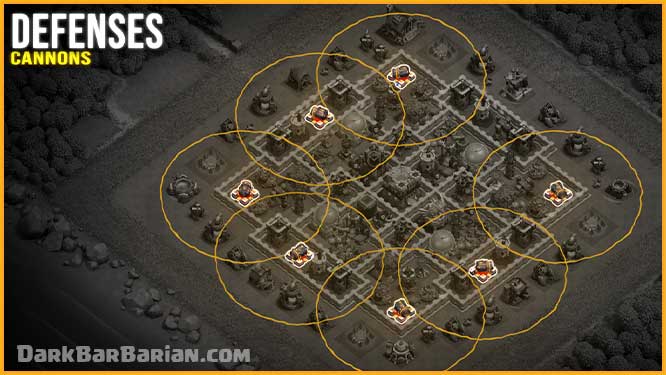
Cannons are strategically placed where they are needed, contributing to the overall balance of the base and allowing it to defend itself effectively against ground attacks.
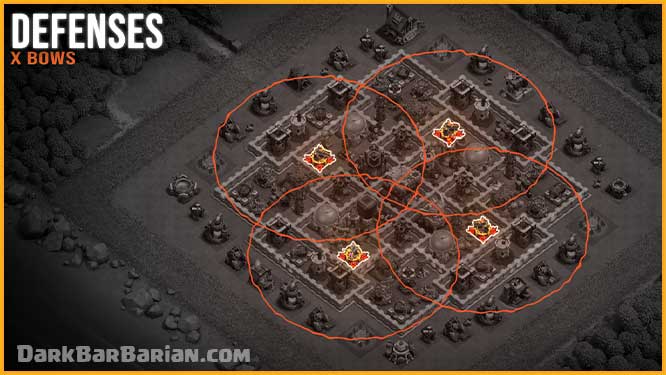
X-bows are well protected in these four compartments, and they are set to both ground and air, because as I saw, I was targeted by both ground and air armies, so setting it to ground just for the additional range isn’t really worth it.
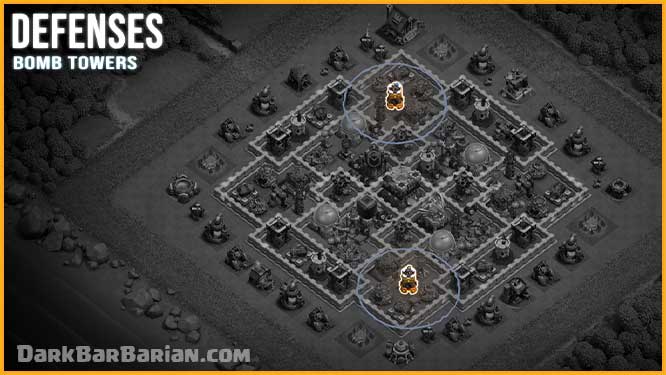
At Town Hall 11, there are two bomb towers strategically positioned in separate compartments. Despite their short range, bomb towers have a unique ability to deal damage similar to giant bombs upon destruction. To maximize this ability, they have been strategically placed alongside giant bombs, creating a devastating double giant bomb effect. This combination can catch opponents off guard, as demonstrated in the clip, where the opponent’s lack of attention resulted in a significant portion of their army being wiped out by this lethal bomb tower and giant bomb synergy.
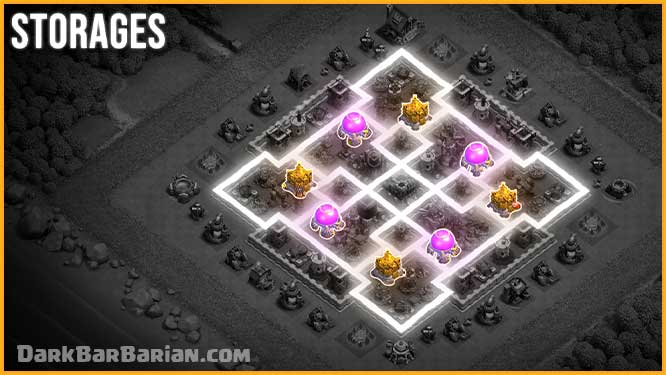
In this base design, storages are strategically spread across multiple compartments to prevent easy access for attackers. Unlike rookie base designers who concentrate storages in the center, this base ensures that the attacker must conquer the entire base to obtain all the loot. Additionally, it’s crucial to avoid placing the same type of storages on one side of the base, as it allows attackers to quickly seize a large portion of resources, for example, if we put both gold storages on this side of the base, the attacker will be able to grab almost all of your gold merely by destroying this portion of the base. As a result, in order to avoid this, We alternate their placement, much like this base.
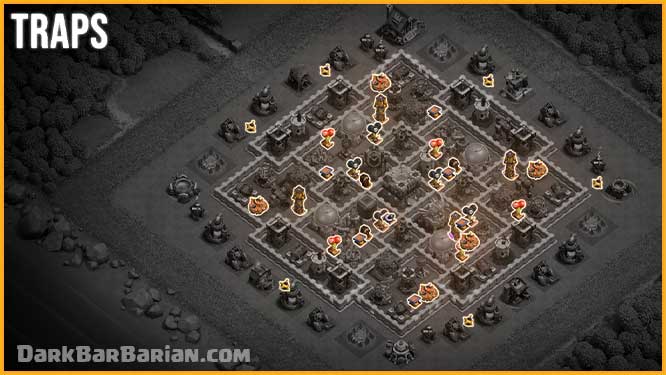
In regards to trap placement, I’ve seen plenty of attacks on this base and discovered certain areas where most opponents are likely to drop their troops, as well as pathings where troops are most likely to walk through, and I’ve planted these traps in those areas to make maximum use of them.
after observation of so many attacks on this base, spring traps, and giant bombs are strategically placed in different compartments according to the pathing of defense attacking troops like hogs and giants, which helps in making this base stronger against ground attacks.
we have placed those bombs out there so that they can take out the wall breakers, which can potentially ruin attackers funnel as the troops wouldn’t be able to go inside the base, and they’ll end up going for the outer trash buildings which will end up ruining the attack.
All seeking air mines and air bombs are spreaded near the air defenses so that they can help our air defense against air attacking troops.
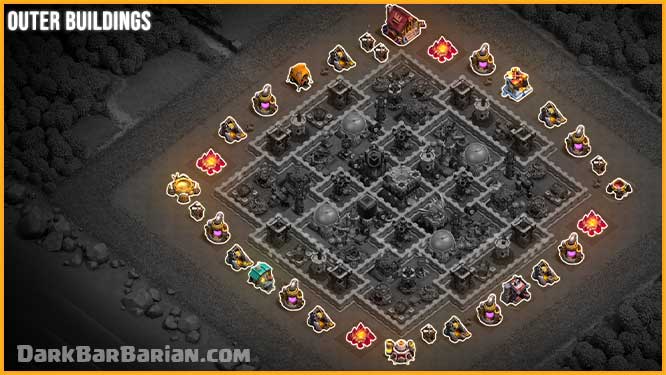
In order to protect the outer buildings, I’ve arranged them in an alternating layout. This way, collectors of the same type are not placed near one another, which is a common mistake many players make. By clustering similar collectors together, they become easy targets for attackers. By spreading them across different sections of the base, I make it significantly harder for attackers to quickly loot everything, improving the overall defense of your resources.
That’s it for the Base Analysis.
If you want to copy this base just click on the Copy Base Button, it will redirect you, from where you can easily copy this base design.
BEST DEFENSIVE CLAN CASTLE TROOPS COMBINATIONS
Using clan castle troops for defending your base is highly recommended as they can put the attacker in trouble by distracting them. Even though the base alone is sufficient to stop most of the attacks used by Town Hall 10 attackers, using the clan castle can help a lot. At Town Hall 10 you can get Maximum of 35 housing space in your clan castle, here are some of my recommendations for CC troops combinations for defense at Town Hall 10 :-
- 1 Electro Dragon + 1 Balloon (Recommended)
- 1 Baby Dragon + 2 Valkyrie + 2 Wizard
- 1 Golem + 1 Wizard + 1 Archer
- 1 Witch + 5 Wizards + 3 Archers
- 1 Lava Hound + 1 Balloon
- 1 Dragon + 3 Wizard + 1 Archer
Since most people can’t get these troops from their clans, you can also use other troop combinations which are easily available like all wizards, all balloons or any other troop combination but i highly recommend you to have above mentioned troops for best defensive experience at Town Hall 10.
FEATURES OF THIS BASE
- Centered and well-protected Eagle Artillery
- Air Defenses are well protected
- Optimal Perfect traps placement
- So many compartments that slows down opponent troops
- Wizard Towers in well-protected compartments
- Great Against Both Ground & Air Attacks
- Inferno towers well protected near the core.
- X-bows in well protected compartments
- Archer Towers in each corner of the base.
- Bomb tower is placed near the inferno towers.
COPY BASE
If you want to copy this base just click on the Copy Base Button, it will redirect you, from where you can easily copy this base design.
Copy Base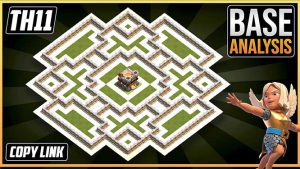
Nice
I like the base of town hall 11
Thanks